Getting Traffic To Your Site Through Blogging And SEO
A longer-term approach to building your business through blogging and SEO.

This post is part of the 60 Day Project – one post a day to help you prepare your business for success in 2021. Subscribe using the button below to get new posts sent straight to your email.
Identifying The Constraint
I had a problem.
I had spent months building out the “infrastructure” of my business, Craftsman Creative.
I created a course platform using Thinkific, created two courses, and launched them both within a month!
It was a TON of work, but was extremely fulfilling…
Until…
Crickets.
I had almost no traffic to the site. Even though I’d shared my new courses with everyone I knew on every social media channel and every email list…I sold only a handful of courses.
Now, I have to keep reminding myself that my decision to launch a brand new website and two courses at the start of a shutdown caused by a global pandemic may have attributed to the results…
Nonetheless, I needed to fix one of two things – the traffic, or the offer.
Since I didn’t have enough traffic to figure out if the offer was working, I decided I need to figure out traffic.
Here’s the results from that first month of the site going live:
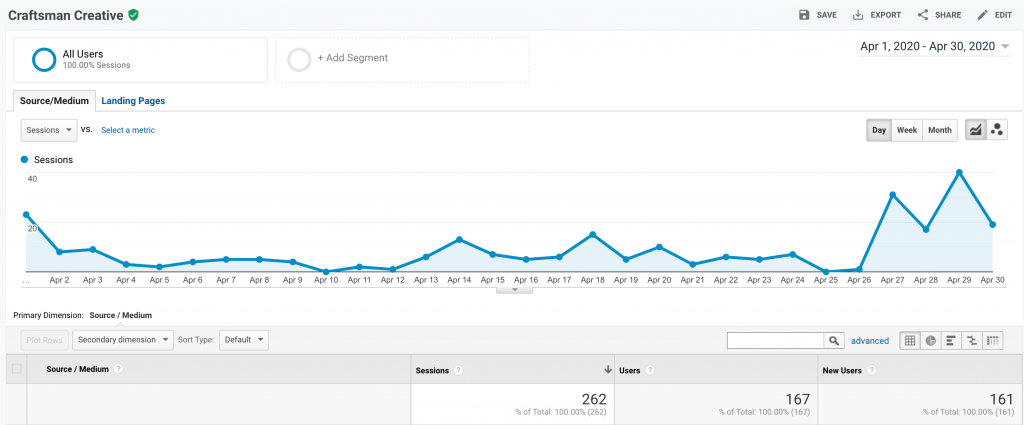
As you can see, I only had 262 sessions and 161 new users. For context, I would need to sell 40 courses – more than one per day – to hit my target of $10,000 per month in revenue.
40 courses from 161 users would be a 25% conversion rate… in reality, my conversion rate was 4%. Not terrible, but also not enough to make up for the lack of traffic.
Having identified the issue – traffic – I set out to affect what I had control over and fix the problem.
Coming Up With A Plan
There are only a few ways that you can get traffic coming to a new website. You have paid traffic – using ads or affiliates to send traffic your way.
I didn’t have enough revenue or data to start pouring money into ads, but I did set up some affiliate partners. That earned me exactly 0 sales.
You can use partnerships, which I’ll talk about in a different post.
Then you have free/organic/earned traffic. This is the traffic that comes from people searching for you, seeing a link to your stuff, or coming directly to the site because they heard about it from you or someone else.
I narrowed in on the free traffic options, and realized that I had a lot of opportunity when it came to search.
My audience that I was seeking to serve was out there, and they were looking for what I was producing – courses on how to make something creative, how to start a business, how to create products, and more.
I just wasn’t doing anything to let them know that I existed.
After taking a deep dive over the last month into SEO and content marketing, I want to share the approach that I’ve taken. While I don’t yet have results to share – SEO can take 6 to 8 months to start seeing results – I’ll keep you updated as things progress.
Using Content & SEO To Get More Traffic
This is a summarized version of what I’ve done over the last month to set up my site(s) for SEO success in 2021.
Step 0 – before even starting the SEO strategy – was to define a goal.
I want to get 10,000 people a month visiting my site from SEO.
With that goal in hand, I could begin, and have a way of measuring the success over the next few months. (You can see how that goal resembles the one I have for this blog, and the 60 Days Project).
Step 1 – Set Up The Site Properly
You can see how my mind works. I always go to building the infrastructure first. It’s motivated from my experience launching things too soon and being “caught with my pants down” a bit when it comes to the execution.
While some people may say “launch before you’re ready” or before you even have a product, it’s just not comfortable for me.
Here are a few steps I took to make sure my site was set up properly:
Make sure that you’re using a site that can handle SEO and blogging.
There are certain sites that are better set up to handle SEO and content. Thinkific, for example, is not. They aren’t a blogging site. They’re a white-label course platform.
In order to hack a blog together, you’d have to use custom pages, but it wouldn’t really work and is a lot of extra steps to make it look, feel, and function like a blog.
Historically I’ve used WordPress to set up my sites. This site is build on WordPress. I’ve done it enough that I was able to get up and running with proper hosting, a lightweight theme, and all of the tools and plugins that WordPress provides.
(For those interested, I use SiteGround for my hosting, and the Generate Press theme, and the most important plugin for SEO – Yoast)
The reason I chose a self-hosted blog rather than something like Medium, is that I want the traffic to come to me, not to Medium.
It’s the same reason people are moving their newsletters from Substack to their own platform, because all of their traffic was going to newsletter.substack.com.
They were losing out on all of the benefits of SEO. (Though Substack now allows you to pay for a custom domain…)
I highly recommend using WordPress or even Squarespace for your blog, that way you have the ability to add important things like keywords and metadata that we need for each post.
Two other considerations – make sure that your blog posts end up with real words in the link, rather than a random string of numbers. So daren.blog/name-of-post rather than daren.blog/11/10/2020/postid12ANRUYkfty21.
That second option gives no context as to what the post is about, whereas the first one – and every blog post on this site – is very clear as to what it’s about.
There’s a TON more that you can do, but for sake of time I’ll link to my favorite resource I found during this process, which is the free course from Growth Machine, a content agency in Austin, TX run by Nat Eliason.
Step 2 – Find Keywords For Your Site
This is arguably the hardest part, as it takes a lot of time, a lot of focus, and a tool that isn’t free.
Since I was determined to figure it out, I went with AHREFS, the industry standard tool for this kind of research.
They have a 7-day trial for $7, so I was sure to cancel the subscription before it kicked in at the hefty price of $99/month.
Since I’m not an agency, I didn’t need the full month subscription, so I just made sure to do all of my research in those seven days.
What this stage looked like was a lot of guessing, a lot of trial and error, and a lot of searching for some hidden nuggets.
I’d never done anything like this before, so initially it was a bit daunting but after a day or two of it I found it to be a lot of fun.
There are countless blog posts and youtube videos that can walk you through the process step by step, but here’s a breakdown as an overview:
- Come up with high-level topics that I would want to be “ranking” for when people search for them. I asked myself the question “what can I help people with” and came up with a list from there.
- I would then take each one of those terms or topics – known as “keyword prhases” – and enter them into the Keyword Explorer section of AHREFS.
- There are thousands and thousands of keywords that come up, so I narrowed it down using filters. I would search for keywords that had the word I was searching for, and then narrow down the KD, or Keyword Difficulty to be less than 30, and the Volume to be greater than 500. This meant that I was only looking for keyword phrases that were potentially easy to rank for, and had enough people searching for it each month to be worth writing a post about it. Here’s a video from Nat on that process.
- Go through that process for each of my high-level keywords, and write down the ones that felt like a good fit. For example, a high-level keyword I found for Craftsman Creative was artists and clients. It had a keyword difficulty of 1 and 3,000 monthly searches. I could easily think of a post about “artists and clients” that would be a great resource for those searching that topic.
Step 3 – Plan Out Your Content
With 100+ keywords in a spreadsheet, I could now sort them based on keyword difficulty, interest, and search volume. I planned out 3 months of content that way, in about an hour.
I knew the topics I was going to write on, and even organized them into groups so that one week I could write about coaching, another week about leadership, and so on.
The recommended frequency is about 2-3 posts per week. As you’ve noticed, I’m doing 7 posts a week on this site all under the same process. I’m very specifically targeting keywords with each new post, and writing a post a day will get me more posts faster, so that I can get to the results quicker.
Ultimately this blog will be a feeder for my other two companies, Benchmark and Craftsman Creative, while also encouraging people to work with me directly from this site.
(Remember how I said that Thinkific wasn’t set up well for blogging & SEO?)
Step 4 – Write Content With SEO In Mind
At this point it’s time to write the content. There are a few things that I check with every post to make sure that it has the best chances of “ranking” – meaning appearing on the first page of google’s search results – possible.
If your content isn’t on that front page, it’s very rare that people will find it through search. I read that 90% of the traffic goes to the links on the front page of Google. So we need to do everything right to show Google that our site best answers the question or is the right resource for that person who is searching.
Here are the main things:
- Title – include the keyword phrase in the title
- Headings – make sure to include it in at least one of the headings. Be sure to USE headings, not just bolded text. Ideally an H2 or H3 tag, as below that gets ignored, and the H1 tag should be reserved for the title of the blog post.
- Metadata – if you’re using a tool like Yoasts SEO plugin, it will give you fields to fill in at the bottom of a post where you can add your focus keyphrase, a slugline, and a meta description. These are the most important things, but it also gives you feedback on how to improve your post, as well as a simple green/orange/red scale for how your SEO looks.
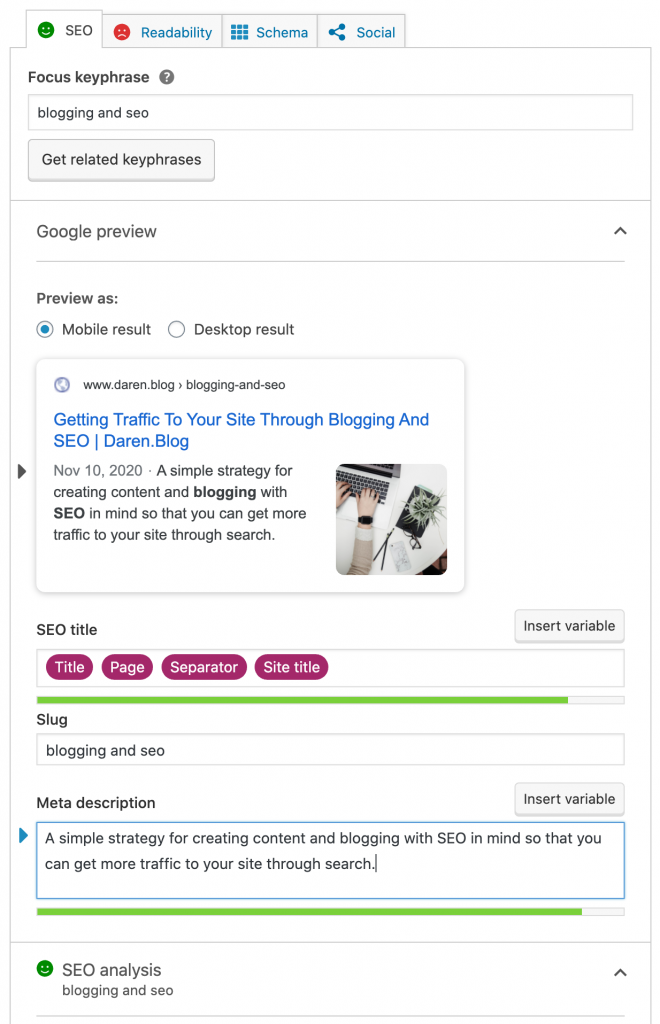
Green = good, so it’s important to spend some time making sure that you get your SEO good to go before hitting publish.
Step 5 – Promote Your Content
It will take a long time to get your content to rank if you never share it with anyone. It’s like writing and publishing a book but never putting it up for sale.
Simple things I do each time I publish a post is to share it on social media. Facebook – as much as I hate the platform and don’t even like having the app on my phone – consistently does better at getting people to my site than other platforms. I have about the same number of friends on FB as I do followers on Twitter, but I get 10x the clicks from FB.
I share new posts to my personal profile, the appropriate facebook page, and any groups that might find it helpful.
I share it to Twitter and LinkedIn as well, all using a site called Buffer. Buffer lets you write one post and schedule it across multiple platforms, saving me time.
Three other tricks I use that help – first is to tag anyone that I mentioned in the post. For this one, I’ll tag Nat Eliason on Twitter, since his resource is the one I’m linking to in this post, and he’s become “the guy” that I turn to online when I have a question about this, as he’s written extensively on the subject as well as runs an agency that does this for people. (I had a call with them last week to discuss working with them in the future…)
The other is to use a service called Quuu. Quuu lets you select posts that you’ve written and get them shared by their audience of people. I’ve only been using it for about a week, but it has doubled the number of views to my content.
The most important promotion strategy that I use though is to have an email list. I have over 1,000 people that have subscribed to get my content, and I can share any post with those that have given me permission to do so. Each week as part of my BCC newsletter, I can include links to these daily posts from the 60 Day Project and share them with those who may have missed them.
While right now I’m not getting a lot of search traffic, I can get people reading the posts and visiting the site, which signals to Google that this is a real site that real people are visiting, and depending on how many sessions are occurring over a given time period, it will help signal that I’m a site that’s ok to include in search results down the road.
Step 6 – Track Your Data
You may be wondering what my obsession is with data. Well – I have found it to be the fastest way to identify the constraints in a business and then take action in a way that gets results.
Want to grow your business? Use data to identify the constraint – in this case, traffic – and then get creative on how to turn it from a constraint into a strength.
Using a tool like the Benchmark App I created this year with my brother will help you do just that – identify the constraint and decide what to do about it.
You need to check in once a week or so on how your data is doing. Use tools like Google Analytics to see the site traffic, and you can use AHREFS or other tools to see how you’re ranking for keywords down the line.
Write down a few numbers and track the changes over time. Don’t just write a blog post and ignore it.
Had I figured this all out years ago with my other sites, I probably would have thousands of visitors a month to my content. Instead, I get an average of about 20-30 visitors a day, and nothing comes of it because I didn’t optimize those pages for SEO or for getting people to take action using a content strategy.
I’ll keep you updated as things progress, and will share the specifics for traffic and results when they start coming in.
Want help with your own blogging & seo strategy? Let’s see if I can help you get set up.


Member discussion